
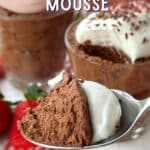
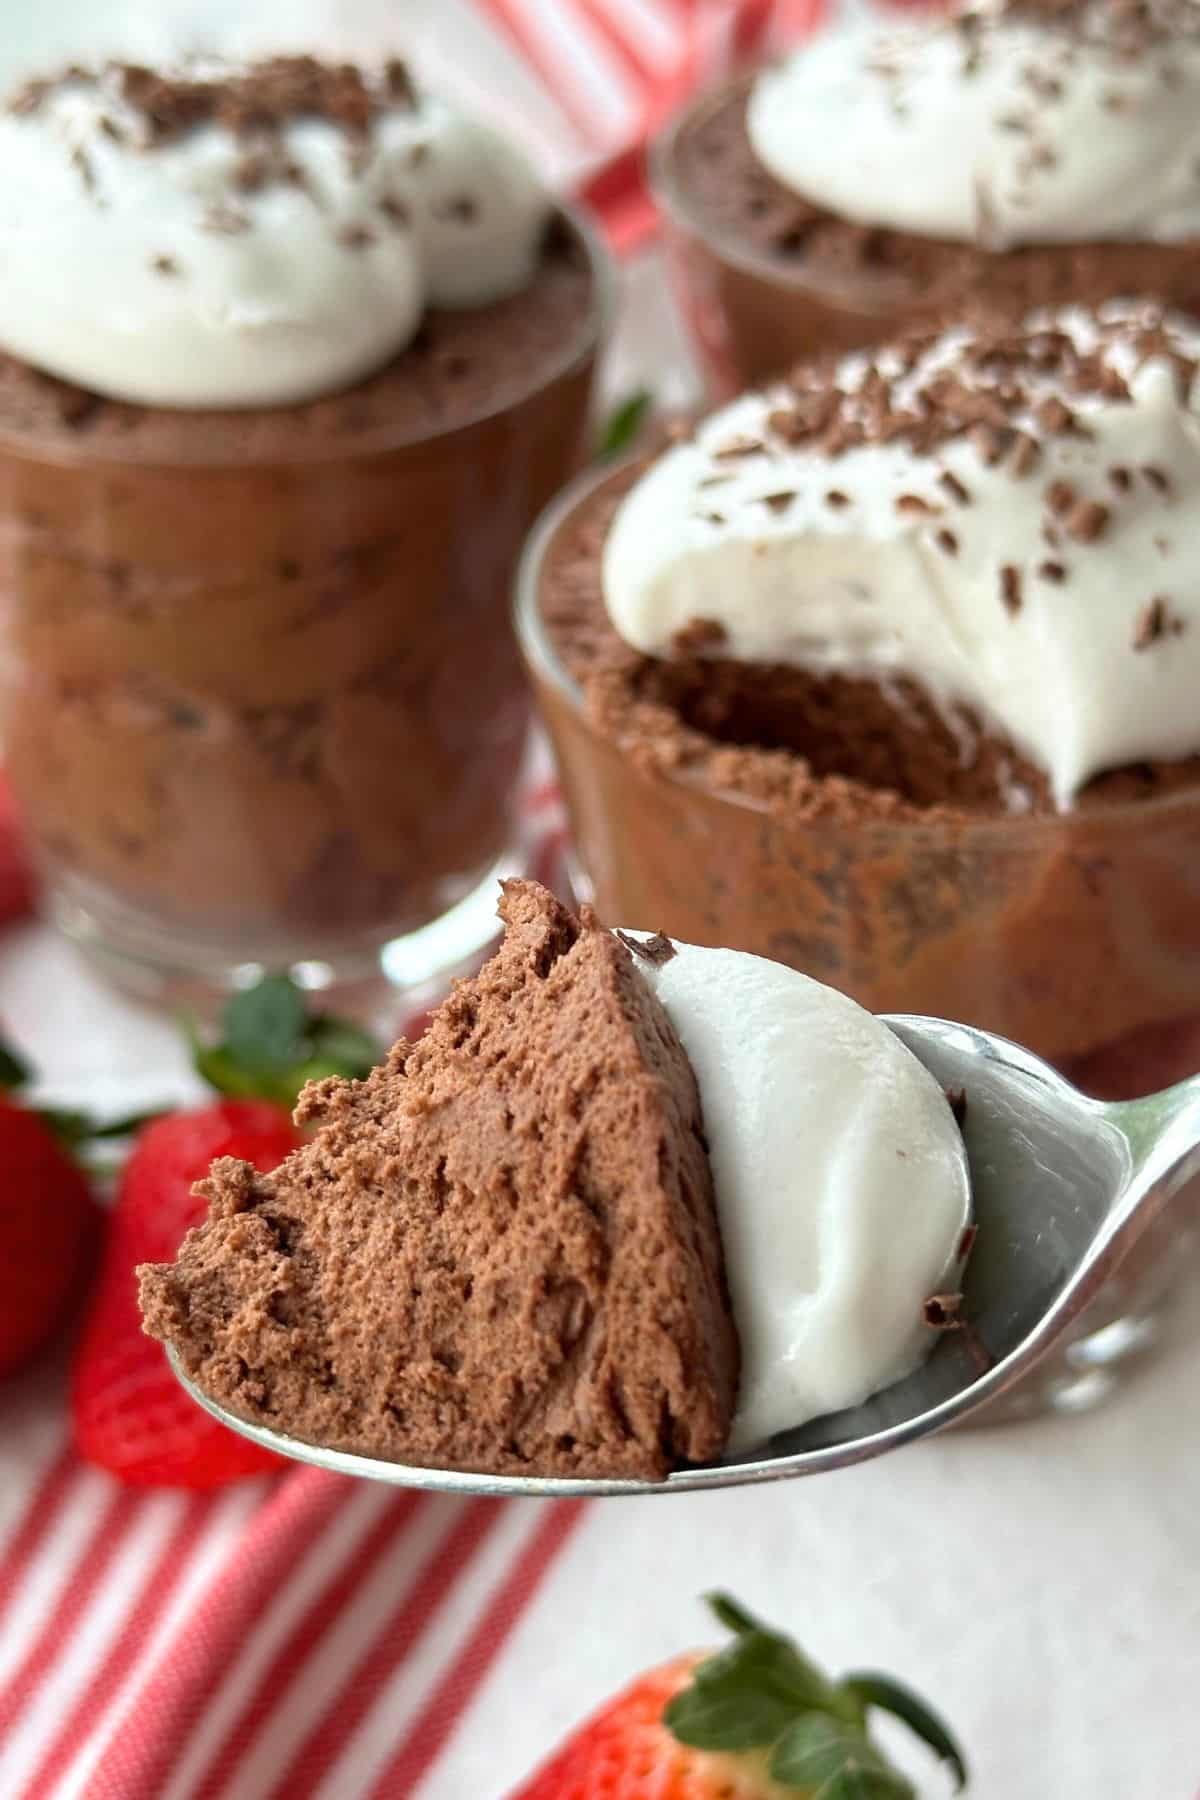
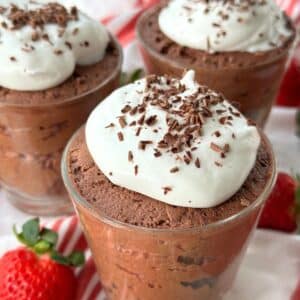
3 Ingredient Vegan Chocolate Mousse with Aquafaba is excellent for any special occasion. This vegan mousse recipe has a rich chocolate flavor and a melt-in-your-mouth delicious texture.
Want to save this recipe?
Plus more tasty vegan recipes every week. Unsubscribe at any time.
You’ve seen chickpeas in action in other desserts, from brownie batter hummus to flourless chickpea brownies.
But beyond the bean, chickpea water, AKA aquafaba, is a magical ingredient all in itself. Something that otherwise would usually be discarded can turn into a vegan mousse!
Nowadays, there are many different ways to make mousse, but this vegan mousse recipe aims to replicate a traditional French-style mousse.
Traditional mousse does not include heavy cream, as many American variations do today. Instead, the eggs do all the work! In the case of this vegan recipe, that means aquafaba.
The result is a velvety mousse with a rich, dense texture. This delicious vegan dessert is perfect for chocolate lovers.
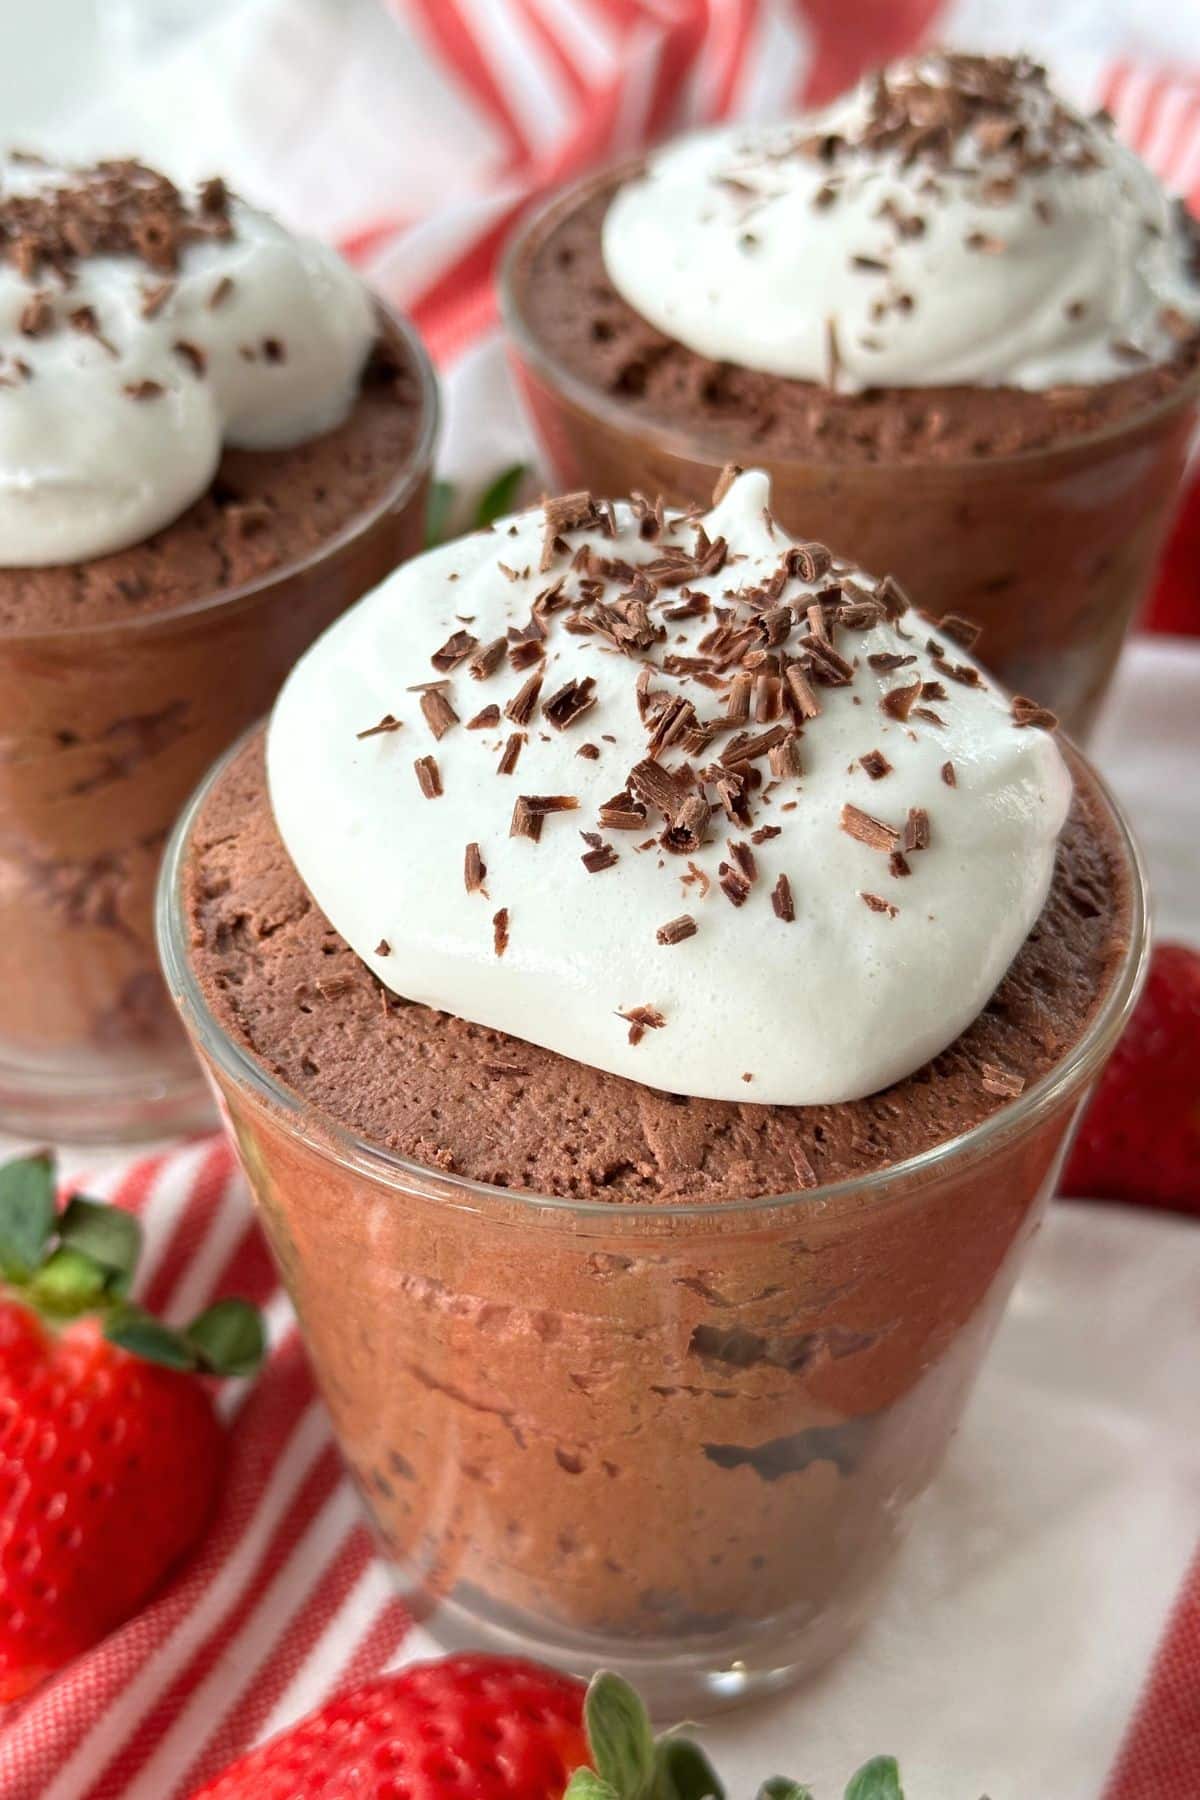
You only need a small serving of it because it’s so indulgent! It pairs perfectly with a dollop of coconut whipped cream and some fresh raspberries or strawberries to offset the chocolateiness.
Why This Vegan Mousse Works
While this 3 ingredient mousse may seem like magic and tastes like it too, it’s all made possible thanks to one key ingredient: aquafaba.
What Is Aquafaba?
Discovered in 2014 by French musician Joël Roessel, aquafaba is the liquid leftover from cooking chickpeas (or other beans). The word comes from “aqua” for water and “faba” for bean, so bean water!
It is best to use aquafaba from a can of chickpeas, which tends to be more concentrated, instead of chickpeas you’ve cooked at home.
Aquafaba Vs. Egg Whites
Let the battle of aquafaba versus egg whites begin! Do they match up? Can bean water really mimic an egg?
Yes! One study found that the main components of aquafaba are polysaccharides, sucrose, and various proteins. From a chemical standpoint, this is quite similar to the makeup of the egg white.
Foaming Ability
The foaming ability of egg whites makes many French recipes possible, from mousse to macarons to meringues. This is yet another quality present in aquafaba, all thanks to the saponins found in chickpeas.
Whereas in recipes like popped quinoa or lemon quinoa, this soapy coating is undesirable and something you want to wash off, it makes it possible to whip aquafaba into stiff peaks to make a classic French mousse.
Ingredients
Here's what you will need to make 3-ingredient vegan chocolate mousse:
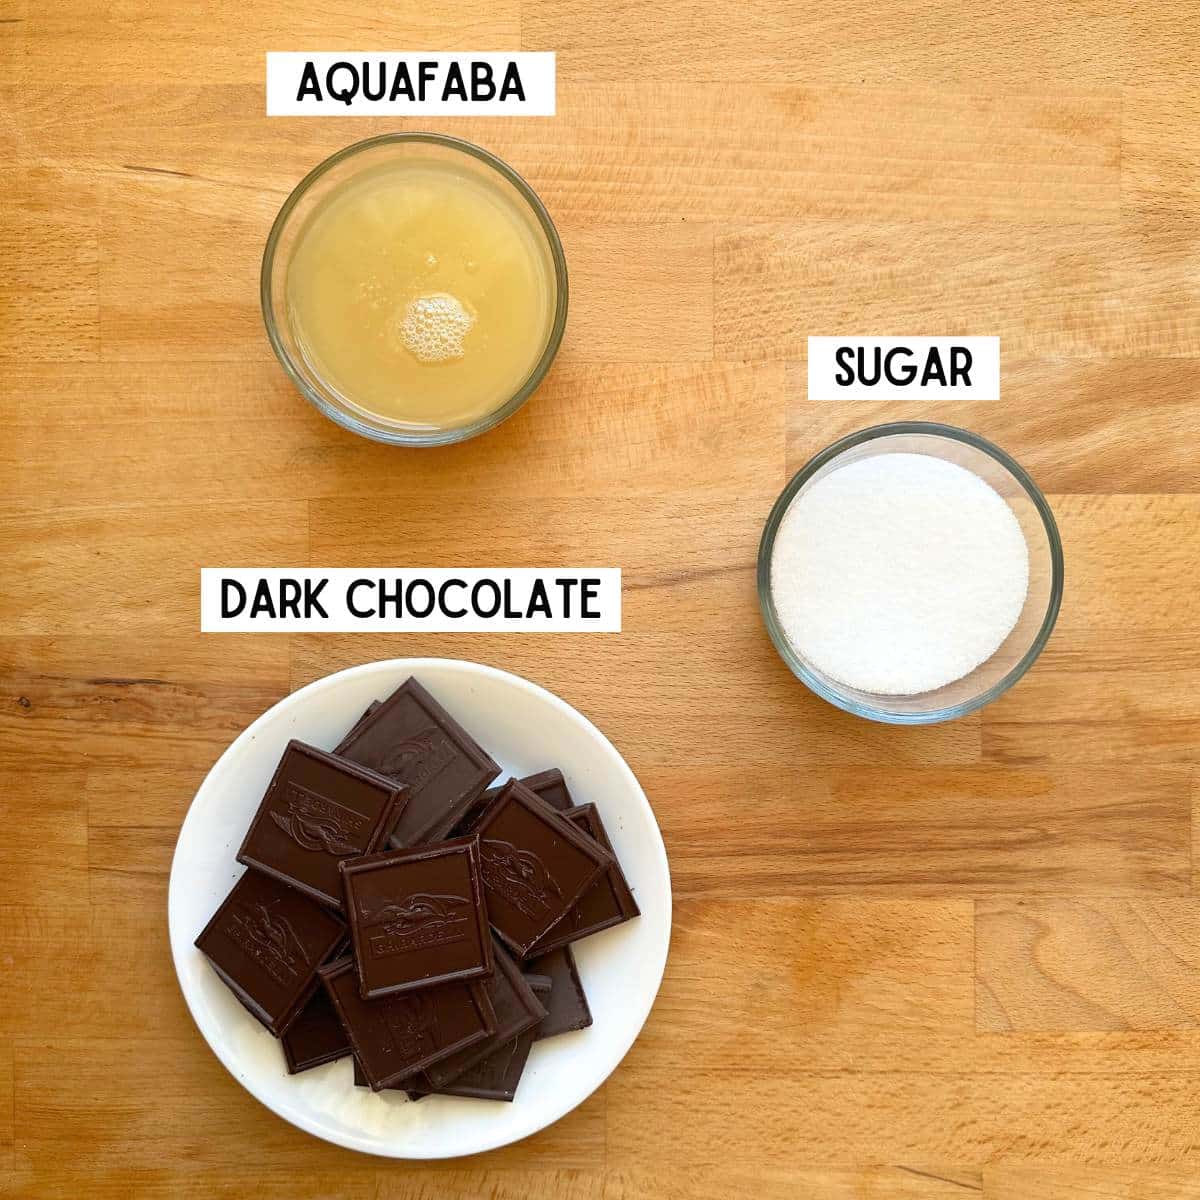
- Aquafaba is key to making a French-style vegan chocolate mousse! Other recipes may use silken tofu or canned coconut cream, which can create a deliciously creamy chocolate pudding or mousse-like dessert, but it would not be a classic French-style mousse.
- See the notes above for why aquafaba works in this recipe!
- Dark Chocolate gives this mousse a rich, chocolatey taste. Using a high-quality dark chocolate bar or chocolate chips is important to ensure a high-quality mousse!
- I used two Ghirardelli 72% dark chocolate bars, but for those with an extra sweet tooth, you could also use a non-dairy semisweet or milk chocolate bar.
- Granulated White Sugar is used when whipping aquafaba, helping to stabilize the foam, just as with egg whites. It also adds to the sweetness of this 3 ingredient mousse.
- Since granulated sugar is essential for whipping, a liquid sweetener can not be substituted. If you're worried about there being too much sugar, you can lower the amount to ⅓ of a cup.
The recipe card below includes the full list of ingredients + instructions.
Equipment
To make vegan chocolate mousse with aquafaba, you will need a stand mixer, an electric hand mixer, or an immersion blender with a whisk attachment.
Theoretically, you could try whisking the aquafaba and sugar by hand, but that would take a lot of arm strength and time!
I used an immersion blender with a whisk attachment and a large bowl with a handle and tall sides to contain any splatter from the process.
When you start whipping the aquafaba, it will seem like you have way too big of a bowl, but trust me, as you beat it, the volume will increase dramatically.
Furthermore, you want the bowl with a handle or a heavy base to keep the bowl firmly in place. Since aquafaba is quite light, if you let go of the bowl's handle while whisking, the bowl will start turning, leading to a huge mess!
Directions with Pictures
Here’s a step-by-step guide to making the best 3 ingredient vegan chocolate mousse with aquafaba:
1. Melt the Chocolate
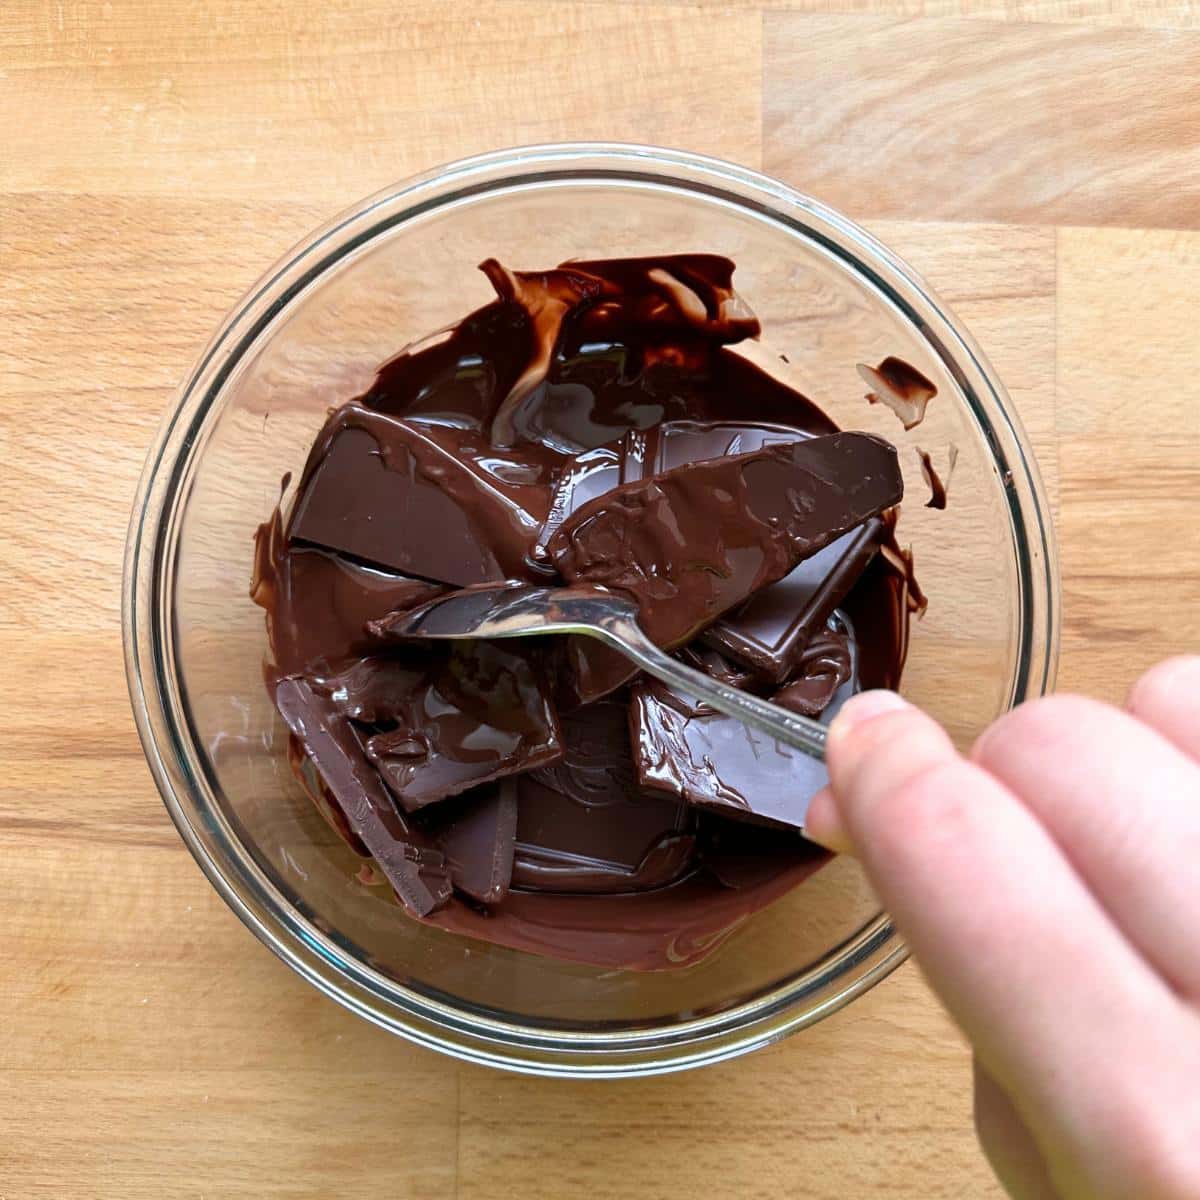
Break the chocolate bars into small pieces and place them in a microwave-safe bowl.
Melt chocolate in the microwave in 30-second intervals, mixing in between. The amount of chocolate needed for this mousse usually takes 60-90 seconds to melt completely.
Set aside the chocolate to cool while you prepare the aquafaba.
2. Measure the Aquafaba
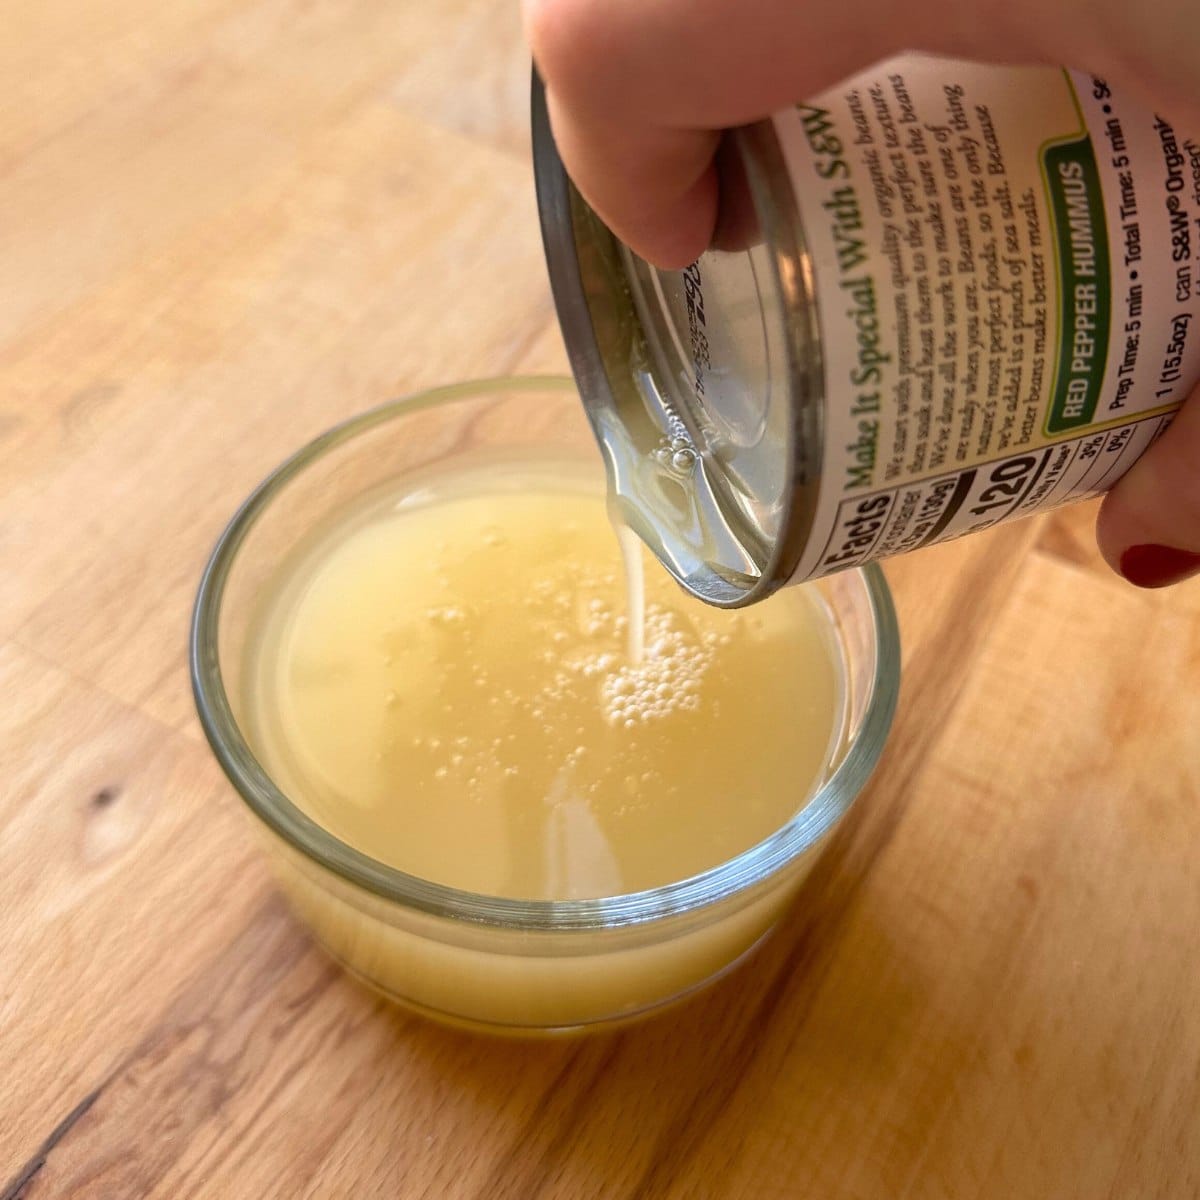
Pour out aquafaba from a can of chickpeas into a measuring cup.
The quantity will vary from can to can, but you want at least ½ cup of liquid. I have tried this recipe with ½ cup and ¾ cup of aquafaba with nearly identical results.
3. Whip Aquafaba with Sugar
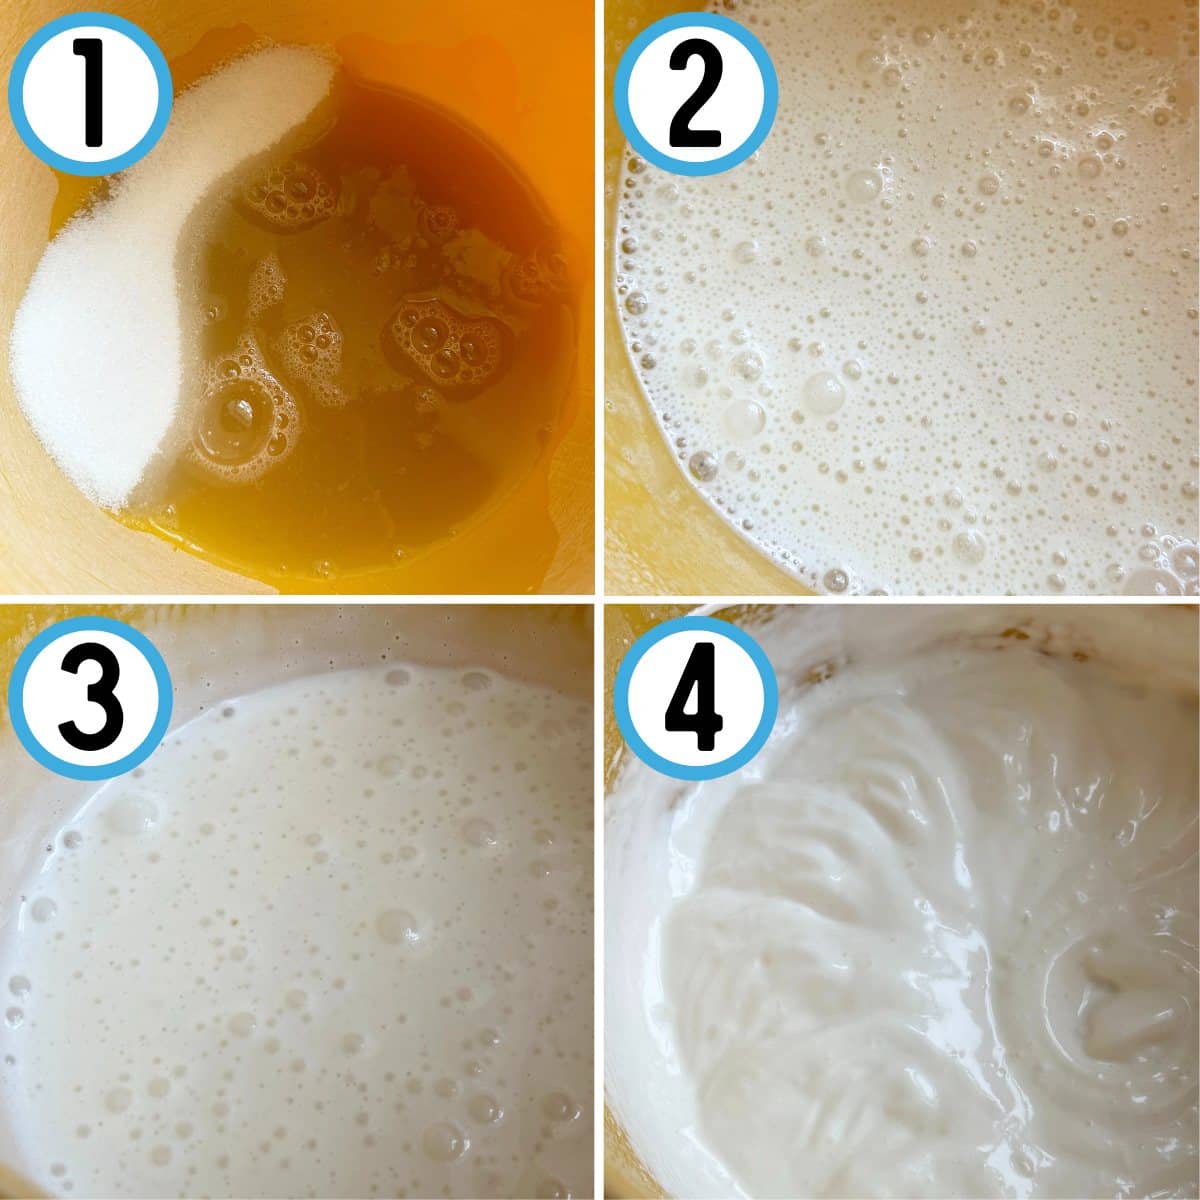
Place aquafaba and granulated white sugar in a tall bowl with a handle or into the bowl of a stand mixer (Photo 1).
Set a time for 15 minutes and begin whisking the aquafaba mixture.
The aquafaba will go through various stages during this time:
- 2 minutes - Frothy
- 5 minutes - Milky, foamy, lots of little bubbles (Photo 2)
- 10 minutes - Gaining volume, more viscous, silky finish, larger bubbles (Photo 3)
- 15 minutes - Glossy, no bubbles, creamy texture like whipped cream, soft peak stage (Photo 4).
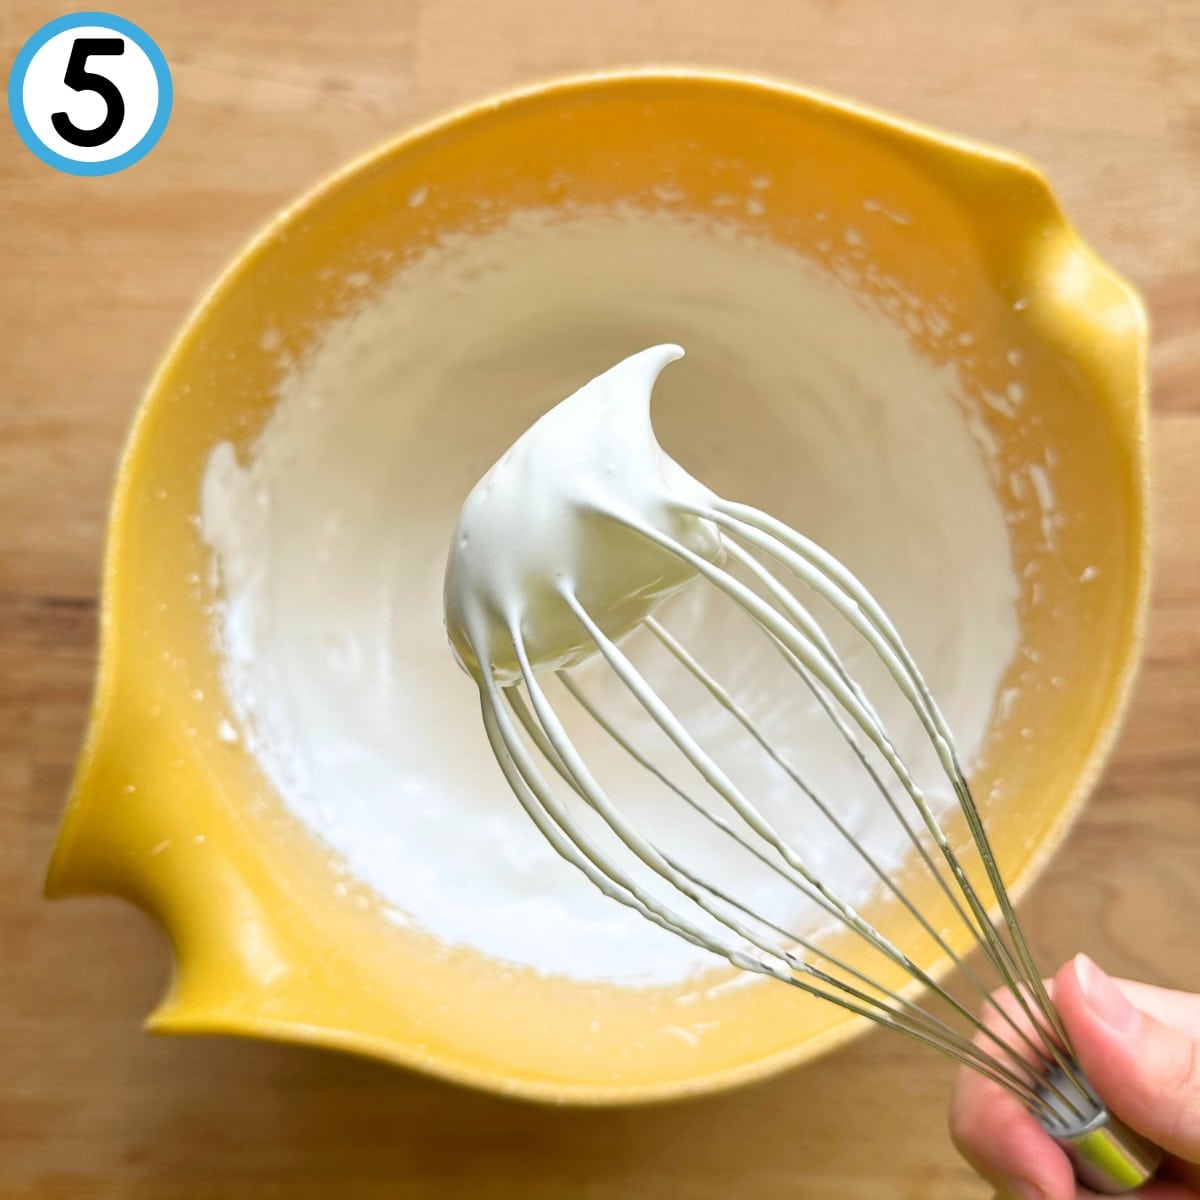
Continue whipping for 2 to 5 minutes until you have firm, slightly flexible peaks that may curl at the tips (Photo 5).
In total, this process usually takes between 15 and 20 minutes. Needless to say there is some patience involved, but it is worth it to make this mousse!
4. Fold in the Melted Chocolate
While this step may seem simple initially, it is the most challenging aspect of this recipe!
Place the melted chocolate (cooled slightly) and about a third of the whipped aquafaba in a separate large bowl. Very carefully fold the two together using a spatula. This lightens the chocolate mixture and makes it easier to incorporate into the remaining whipped aquafaba.
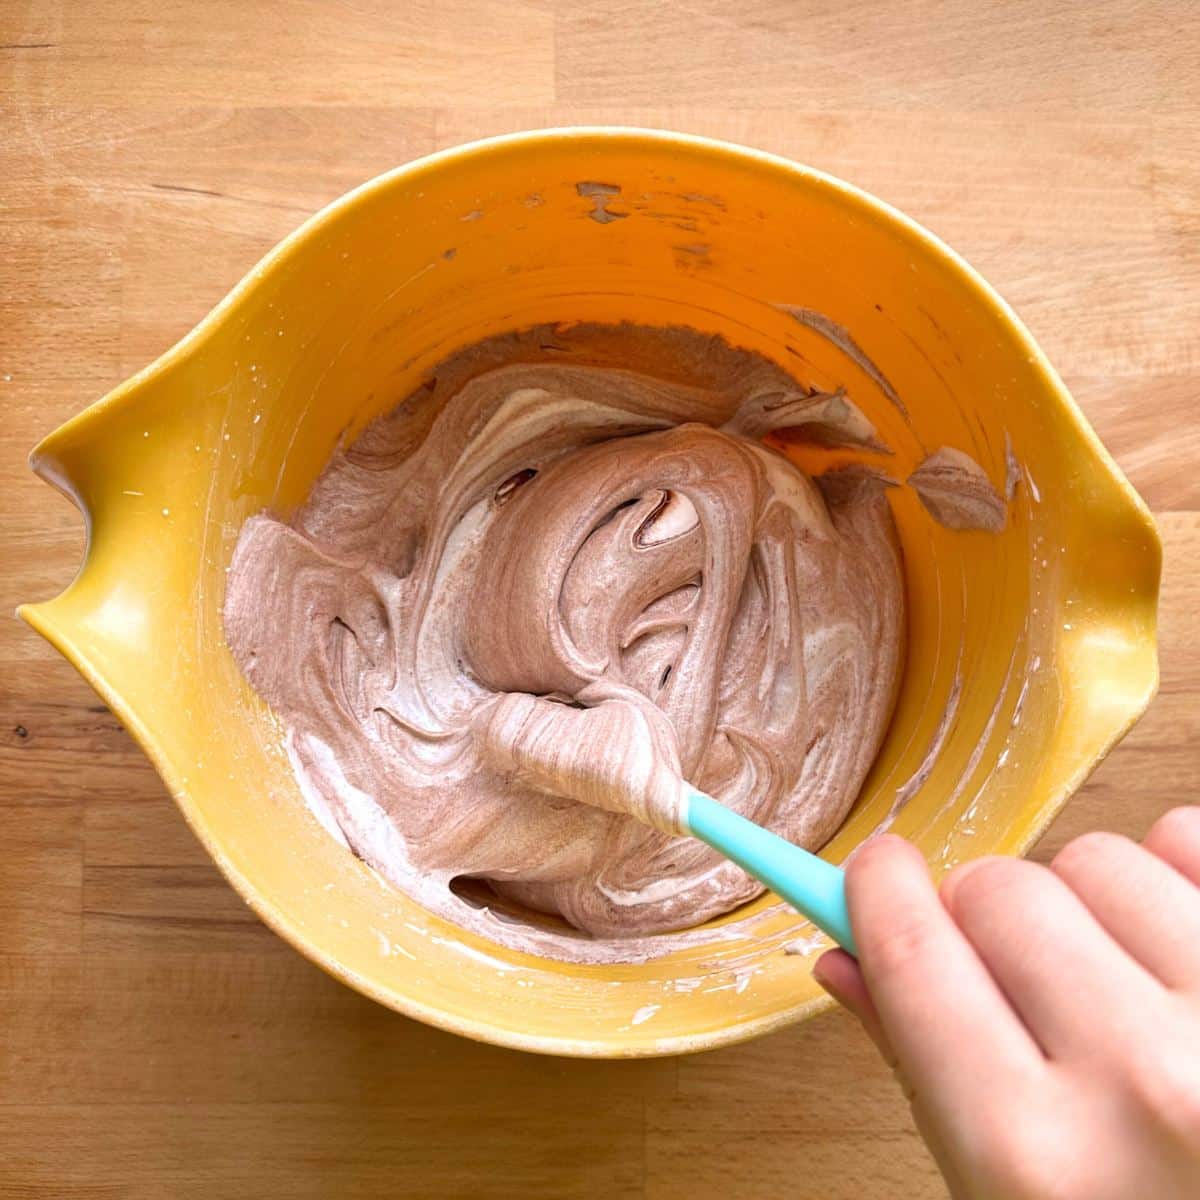
Once there are no more visible streaks, fold in the remaining aquafaba. Mix until there are no more streaks of white remaining.
Scoop the mousse into individual serving containers and smooth out the top with a knife for a flat finish.
Chill the mousse in the refrigerator for at least an hour to allow it to set.
Top Tip
Follow these top tips for the best results:
- Chill the Aquafaba - Unlike chocolate mousse made with real eggs, cold aquafaba tends to whip up more quickly and reach higher volumes.
- Melt the Chocolate First - It’s important that the melted chocolate cools down to about room temperature, or else the texture of the mousse can be thrown off when it is mixed with aquafaba.
- Use Clean Equipment - Make sure your whisk and bowl are free of grease or residue. Any traces of fat can inhibit the aquafaba from achieving its maximum volume.
- Test for Firm Peaks - If using chilled aquafaba, you may only need to whip for 10 to 15 minutes instead of 15 to 20. Occasionally, stop whisking to check and see how the aquafaba is looking. You don’t want to overwhip!
- Fold Gently - Fold the chocolate and whipped aquafaba together gently to retain as much air as possible. Use a spatula and make slow, sweeping motions to combine the ingredients without deflating the whipped aquafaba.
Serving Ideas
3-ingredient chocolate mousse is a versatile and decadent dessert that can be used in various ways. Here are some creative and tasty ways to enjoy this rich chocolate mousse:
- Classic Combination - Dollop with whipped coconut cream, chocolate shavings, and raspberries.
- Chocolate Tiramisu Twist - Incorporate chocolate mousse as a rich layer, adding a delightful chocolate twist to this classic Italian dessert.
- Use Instead of Frosting - Use vegan chocolate mousse as a luscious frosting for cakes with an intense chocolate flavor. The mousse would also provide great stability to a layered cake.
- Make Parfait - Create a berry chocolate parfait by layering this decadent mousse, fresh berries, and maple vanilla granola.
- As a Dip - Take fondue night to the next level! Instead of melted chocolate, serve vegan chocolate mousse alongside fresh strawberries, graham crackers, and vegan marshmallows for a simple yet indulgent treat.
- Pie Filling - Pour this mousse into a prebaked gluten-free pie crust and dust with cocoa powder to create a luscious and easy dessert.
Storage
Store vegan chocolate mouse in the refrigerator for 2 to 3 days. It is best to store the mousse in an airtight container in individual portions with a tight lid or plastic wrap to minimize air exposure and the formation of a skin on the surface.
Want more tasty vegan recipes sent to your inbox?
3 Ingredient Vegan Chocolate Mousse with Aquafaba
Equipment
- stand mixer, hand beaters, or an immersion blender with a whisk attachment
Ingredients
- 7 oz dark chocolate 72% or higher
- ¾ cup aquafaba chickpea water from can
- ½ cup granulated white sugar
Instructions
Melt the Chocolate
- Break the chocolate bars into small pieces and place them in a microwave-safe bowl.
- Melt chocolate in the microwave in 30-second intervals, mixing in between. The amount of chocolate needed for this mousse usually takes 60-90 seconds to melt completely.
- Set aside the chocolate to cool while you prepare the aquafaba.
Whip the Aquafaba and Sugar
- Place the aquafaba and granulated white sugar in a tall bowl with a handle or into the bowl of a stand mixer.
- Whisk aquafaba for 15 to 20 minutes. It will go through various stages during this time. See the notes below for a description of the stages.
- The aquafaba is done when you have firm, slightly flexible peaks that may curl at the tips.
Fold in the Melted Chocolate
- Place the melted chocolate (cooled slightly) and about a third of the whipped aquafaba in a separate large bowl. Very carefully fold the two together using a spatula.
- Once there are no more visible streaks, fold in the remaining aquafaba. Mix until there are no more streaks of white remaining.
- Scoop the mousse into individual serving containers and smooth out the top with a knife for a flat finish.
- Chill the mousse in the refrigerator for at least an hour to allow it to set.
Notes
- 2 minutes - Frothy
- 5 minutes - Milky, foamy, lots of little bubbles
- 10 minutes - Gaining volume, more viscous, silky finish, larger bubbles
- 15 minutes - Glossy, no bubbles, creamy texture like whipped cream (soft peak stage)
- 20 minutes - Firm, slightly flexible peaks that may curl at the tips (firm peak stage)
- Chill the Aquafaba for it to whip up faster and reach higher volumes.
- Melt the Chocolate First and cool it down to about room temperature.
- Use Clean Equipment, any traces of fat can inhibit the aquafaba from achieving its maximum volume.
- Test for Firm Peaks, occasionally, stop whisking to check and see how the aquafaba looks.
- Fold the Chocolate and Aquafaba Gently to retain as much air as possible. Use a spatula and make slow, sweeping motions to combine the ingredients without deflating the whipped aquafaba.
Email me the recipe!
Plus more tasty vegan recipes every week. Unsubscribe at any time.
* The provided nutritional information is an estimate per serving. Accuracy will vary on specific ingredients and brands used.

This recipe has been updated with new pictures and tips. It was adapted from Maggie's recipe that was posted on January 20, 2021.


Comments
No Comments